如何快速實現REST API集成以優化業務流程
OpenAI 最新的開發為我們帶來了?實時 API,旨在允許開發者在他們的應用中創建?快速、無縫的語音到語音體驗。該 API 旨在簡化多模態對話功能的開發,使構建自然的實時語音交互變得更加容易。
在這篇博客中, 我將涵蓋有關此新 API 的 主要問題,包括
實時 API 是 OpenAI 提供的公共測試功能,允許付費開發者在他們的應用中集成實時語音交互。它是一個多模態 API,能夠將 音頻輸入轉換為語音響應,并使用先進的 GPT-4o 模型來實現這一目的。本質上,它允許進行 低延遲對話,類似于自然的人際交互,類似于 ChatGPT 的高級語音模式中看到的功能。
之前,開發者需要將多個模型拼接在一起以實現?語音識別、文本處理和文本轉語音生成。實時 API 將這一切都整合在一次 API 調用中,從而減少延遲,提供更豐富的響應,并更一致地處理口音和重音。
聊天完成 API 也引入了音頻輸入和輸出,但它沒有實時 API 的低延遲體驗。因此,對于語言學習或語音啟用助手等體驗,實時 API 是更優選擇。
對 Realtime API 的訪問目前作為 公開測試版 提供給付費開發者。
雖然說在歐洲的訪問受到限制,但我通過我的第5層OpenAI賬戶能夠使用它。
該API使用 WebSocket 連接,確保音頻輸入和輸出的流暢體驗。
目前,需要注意以下 限制:
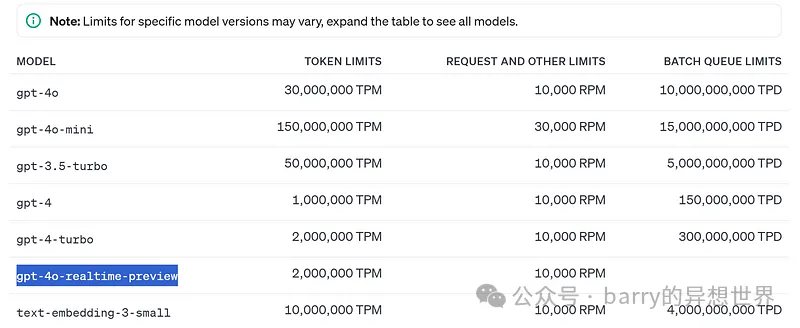
定價結構分為 文本令牌 和 音頻令牌:
這一定價使得開發者能夠負擔得起創建強大的 語音到語音 體驗,盡管音頻功能的成本顯著高于基于文本的交互。在擴展具有語音功能的應用時,這一點非常重要。
這仍然比外包給某些國家稍貴,但我們可以期待在接下來的六個月內價格會顯著下降。

這是一個基本的?Colab 指南,幫助您開始上傳文件、向 Realtime API 發送請求并生成音頻響應。
在這個演示中,我們選擇上傳一系列音頻片段,以模擬對話。
完整的 Colab 代碼:?鏈接在這里,只需將您的 “openai” 密鑰添加到 Colab 的秘密中并運行該 Colab。
#Setup

!pip install websockets pydub --quiet


import base64

import numpy as np

import soundfile as sf

import json

import websockets

from google.colab import files

from pydub import AudioSegment

from tqdm import tqdm

import io在 Colab 中,您可以使用?google.colab?的?files?模塊來上傳音頻文件。
#Upload audio

def upload_audio():

    uploaded = files.upload()

    for file_name in uploaded.keys():

        return file_name


audio_file = upload_audio()tqdm 顯示上傳流的進度。#Helper functions
## Function to convert Float32Array to PCM16 format
def float_to_pcm16(float32_array):
return np.clip(float32_array * 32767, -32768, 32767).astype(np.int16).tobytes()
## Function to split audio into base64-encoded PCM16 chunks
def float32_to_base64_chunks(float32_array, chunk_size=32000):
pcm16_data = float_to_pcm16(float32_array)
for i in range(0, len(pcm16_data), chunk_size):
yield base64.b64encode(pcm16_data[i:i+chunk_size]).decode('utf-8')
## WebSocket connection and streaming audio with text prompt
## Main function to call OpenAI Realtime API
async def stream_audio_to_realtime_api(audio_file, text_prompt, openai_key, verbose = False):
data, samplerate = sf.read(audio_file, dtype='float32')
if data.ndim > 1:
data = data[:, 0]
if samplerate != 24000:
raise ValueError(f"Audio must be sampled at 24kHz, but it is {samplerate}Hz")
url = "wss://api.openai.com/v1/realtime?model=gpt-4o-realtime-preview-2024-10-01"
headers = {"Authorization": "Bearer " + openai_key, "OpenAI-Beta": "realtime=v1"}
async with websockets.connect(url, extra_headers=headers) as ws:
await ws.send(json.dumps({
"type": "conversation.item.create",
"item": {"type": "message", "role": "user", "content": [{"type": "input_text", "text": text_prompt}]}
}))
with tqdm(total=(len(float_to_pcm16(data)) + 32000 - 1) // 32000, desc="Sending Audio Chunks") as pbar:
for chunk in float32_to_base64_chunks(data):
await ws.send(json.dumps({"type": "input_audio_buffer.append", "audio": chunk}))
pbar.update(1)
await ws.send(json.dumps({"type": "input_audio_buffer.commit"}))
await ws.send(json.dumps({"type": "response.create"}))
all_events = []
while True:
response = await ws.recv()
event = json.loads(response)
all_events.append(event)
if verbose:
print(event)
if event["type"] == "response.output_item.done" and "item" in event and "content" in event["item"]:
for content in event["item"]["content"]:
if content["type"] == "audio" and "transcript" in content:
transcript = content["transcript"]
break
if event["type"] == "rate_limits.updated":
break
return all_events, transcript
#Add a prompt and call OpenAI Realtime API
text_prompt = "Summarize this audio content"
events, transcript = await stream_audio_to_realtime_api(
audio_file,
text_prompt,
openai_key,
verbose = False
#to display OpenAI's response as they arrive, use verbose = True
) ## Function to decode and concatenate audio chunks into a full audio file
def generate_audio_from_chunks(audio_chunks, output_filename=None):
# Concatenate the base64-encoded audio chunks from the 'delta' field
full_audio_base64 = ''.join(audio_chunks)
# Decode the concatenated base64 string to raw PCM16 audio bytes
audio_bytes = base64.b64decode(full_audio_base64)
# Load the bytes as a pydub AudioSegment (assuming 24kHz, 1 channel, PCM16)
audio_segment = AudioSegment.from_raw(
io.BytesIO(audio_bytes),
sample_width=2,
frame_rate=24000,
channels=1)
# Optionally save the audio to a file
if output_filename:
audio_segment.export(output_filename, format="wav")
print(f"Audio saved to {output_filename}")
return audio_segment#Extract audio chunks from the collected events
audio_output_chunks = [event['delta'] for event in events if event['type'] == 'response.audio.delta']
## Generate the full audio from the collected chunks
generated_audio = generate_audio_from_chunks(audio_output_chunks, output_filename="output_audioo.wav")通過上述步驟,您可以將 OpenAI 的實時 API 集成到 Colab 筆記本中,實現無縫的語音指令。
本指南應為您提供一個堅實的基礎,以便您實驗實時音頻到音頻的交互,并構建創新的語音驅動應用程序。
文章轉自微信公眾號@barry的異想世界